How to Print Using a Puff Additive
 Screen printing offers a variety of ways to add dimension and texture to your designs, and one of the most popular methods is using a puff additive. This special ink additive expands when heated, creating a raised, three-dimensional effect that adds a unique touch to garments and other printed materials. If you’re looking to enhance your screen prints with a puff additive, follow these steps for the best results.
What You’ll Need:
- Puff additive
-
Plastisol or water-based ink (Ensure you have the appropriate Puff Additive, as different types are required for Plastisol and Water-based inks)
- Screen printing press
- Properly prepared screen (typically mesh count between 34T/(80) to 90T/(230)
- Squeegee
- Heat source (flash dryer/conveyor dryer)
- Garment or material to be printed on
Step-by-Step Guide to Printing with Puff Additive
Step 1: Mix the Puff Additive with Ink
Puff additives can typically be mixed with either plastisol or water-based ink although you will need the right one to match your ink. If you are using plastisol then you will need an additive specific to plastisol, same for waterbased. The recommended ratio varies by brand, but a common guideline is to use 10-20% puff additive per volume of ink. Thoroughly mix the additive into the ink to ensure even puffing.
Step 2: Prepare the Screen
Since puff ink is thicker than regular ink, use a lower mesh count screen (34T/80 to 90T/230) to allow for better ink passage. A higher mesh count may restrict the ink flow and lead to poor puff effects.
Step 3: Print the Design
Load your garment onto the platen and apply the ink using a squeegee with medium pressure.
Step 4: Flash Cure if Needed
If you’re printing multiple layers or colours, flash cure between layers to prevent smudging, until touch dry. However, Its important to avoid overheating, as premature puffing may occur.
Step 5: Cure with Proper Heat
To activate the puff effect, the print must be cured at the correct temperature. Most puff additives activate at around 140 -160°c. Use a conveyor dryer to achieve consistent results. As the ink reaches the right temperature, it will begin to expand and create the desired raised texture.
Step 6: Inspect and Test
After curing, check the design for even puffing and adhesion. Conduct a wash test to ensure durability. If the puff effect isn’t as pronounced as desired, consider adjusting the ink-to-additive ratio or curing temperature.
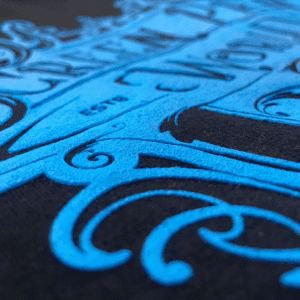
Printed using 15% Puff Additive ^
Pro Tips for Best Results
- Experiment with ratios: Different amounts of puff additive will create varying levels of puffiness. Test small batches to find the right mix for your project.
- Use bold designs: Fine details may not translate well with puff printing, as the ink expands and can blur small elements.
- Store ink properly: Puff additive inks can thicken over time, so store them in a sealed container and mix well before each use.
Final Thoughts
Printing with a puff additive is a great way to add texture and a dynamic look to your designs. With the right materials, technique, and a bit of experimentation, you can create eye-catching prints that stand out. Whether for fashion, branding, or artistic projects, puff ink provides an easy and effective way to elevate your screen printing game.
Give it a try and see how puff printing can bring a new dimension to your designs!
Our Amex Waterbased Puff Additive
Our Amex Plastisol Puff Additive
Need some help? Call us on 01562 829009, email us info@screenprintworld.co.uk or use our online live chat function!

Leave a Reply
Want to join the discussion?Feel free to contribute!